CoolSMS
세상에서 가장 안정적이고 빠른 메시지 발송 플랫폼 - 쿨에스엠에스
손쉬운 결제 전용계좌, 신용카드, 계좌이체 등 국내 결제 뿐만 아니라 해용신용카드로 한번의 카드번호 등록으로 자동충전까지 지원합니다. 전용계좌, 신용카드, 계좌이체 등 다양한 결제 방식
coolsms.co.kr
위 링크에서 회원가입 후 발신자번호 등록, API 키 생성 등등 진행해주면 된다.
그리고 아래의 jar 파일을 넣어준다.
PhoneInsertController
@RestController
@RequiredArgsConstructor
public class PhoneInsertController {

    private final CertificationService certificationService;

    @GetMapping("/check/sendSMS")
    @ResponseBody
    public String sendSMS(String phoneNumber) {

        Random rand  = new Random();
        String numStr = "";
        for(int i=0; i<6; i++) {
            String ran = Integer.toString(rand.nextInt(10));
            numStr+=ran;
        }

        System.out.println("수신자 번호 : " + phoneNumber);
        System.out.println("인증번호 : " + numStr);
        certificationService.certifiedPhoneNumber(phoneNumber,numStr);
        return numStr;
    }
}
CertificationService
@Slf4j
@Service
@RequiredArgsConstructor
public class CertificationService {

    public void certifiedPhoneNumber(String phoneNumber, String cerNum) {

        String apiKey = "";    //본인의 API KEY
        String apiSecret = ""; //본인의 API SECRET
        Message coolsms = new Message(apiKey, apiSecret);

        HashMap<String, String> params = new HashMap<String, String>();
        params.put("to", phoneNumber);    // 수신전화번호
        params.put("from", "010-1111-1111");    // coolsms에서 등록한 발신전화번호
        params.put("type", "SMS");
        params.put("text", "ㅇㅇㅇ의 휴대폰인증 테스트 메시지 : 인증번호는" + "["+cerNum+"]" + "입니다.");
        params.put("app_version", "test app 1.2"); // application name and version

        try {
            JSONObject obj = (JSONObject) coolsms.send(params);
            System.out.println(obj.toString());
        } catch (CoolsmsException e) {
            System.out.println(e.getMessage());
            System.out.println(e.getCode());
        }
    }
}
발신 전화번호는 CoolSMS에서 등록한 게 아니라면 메시지가 전송되지 않는다....
CoolSMS에서 최대 5개까지 발신번호를 등록할 수 있다.
@Value("${coolsms.apiKey}")
private String apiKey;

@Value("${coolsms.apisecret}")
private String apiSecret;
Service에서 원래는 이렇게 사용하여 보안성을 높이려고 했지만 왠지모르게 yml 파일에 적은 것이 인식이 안 되어 @Value에 빨간줄이 뜬다ㅠ
+) 이유를 알아냈다!!
springframework에 있는 value를 사용해야 하는데, 실수로 lombok에 있는 value를 import 한 것이 문제였다...
import org.springframework.beans.factory.annotation.Value;
이걸로 바꿔주면 더이상 빨간줄이 뜨지 않는다!😊👍
index.html
<!DOCTYPE html>
<html lang="ko">
<head>
    <meta charset="UTF-8">
    <title>Title</title>
</head>
<body>
<!-- "전송" 버튼 -->
<input type="text" id="inputPhoneNumber" placeholder="휴대폰 번호를 입력하세요">
<button id="sendPhoneNumber">전송</button><br><br>

<!-- "인증번호 확인" 버튼 -->
<input type="text" id="inputCertifiedNumber" placeholder="인증번호를 입력하세요">
<button id="checkBtn">인증번호 확인</button>

<script src="https://code.jquery.com/jquery-3.6.0.min.js"></script>
<script src="https://cdn.jsdelivr.net/npm/sweetalert2@10"></script>

<script>
    $('#sendPhoneNumber').click(function(){
        let phoneNumber = $('#inputPhoneNumber').val();
        Swal.fire('인증번호 발송 완료!')


        $.ajax({
            type: "GET",
            url: "/check/sendSMS",
            data: {
                "phoneNumber" : phoneNumber
            },
            success: function(res){
                $('#checkBtn').click(function(){
                    if($.trim(res) ==$('#inputCertifiedNumber').val()){
                        Swal.fire(
                            '인증성공!',
                            '휴대폰 인증이 정상적으로 완료되었습니다.',
                            'success'
                        )

                        $.ajax({
                            type: "GET",
                            url: "/update/phone",
                            data: {
                                "phoneNumber" : $('#inputPhoneNumber').val()
                            }
                        })
                        document.location.href="/home";
                    }else{
                        Swal.fire({
                            icon: 'error',
                            title: '인증오류',
                            text: '인증번호가 올바르지 않습니다!',
                            footer: '<a href="/home">다음에 인증하기</a>'
                        })
                    }
                })


            }
        })
    });
</script>

</body>
</html>
참고로 <script src=> 부분을 안 넣었다가 $가 인식되지 않고 Swal이 인식되지 않는 둥 많은 오류를 겪었다.
실행 화면
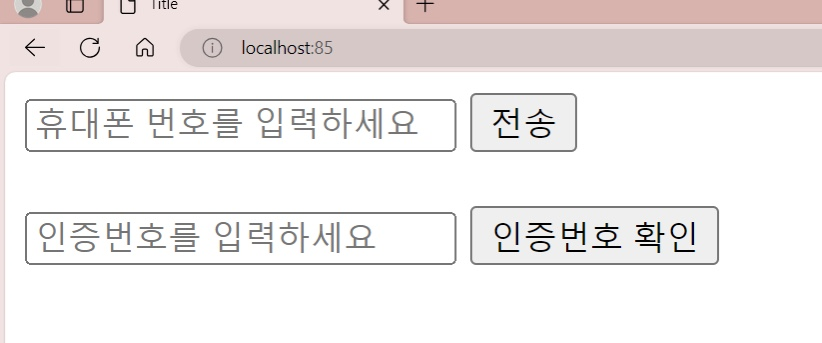
포트 충돌을 방지하기 위해 포트번호를 85번으로 바꾸고 실행하였다.

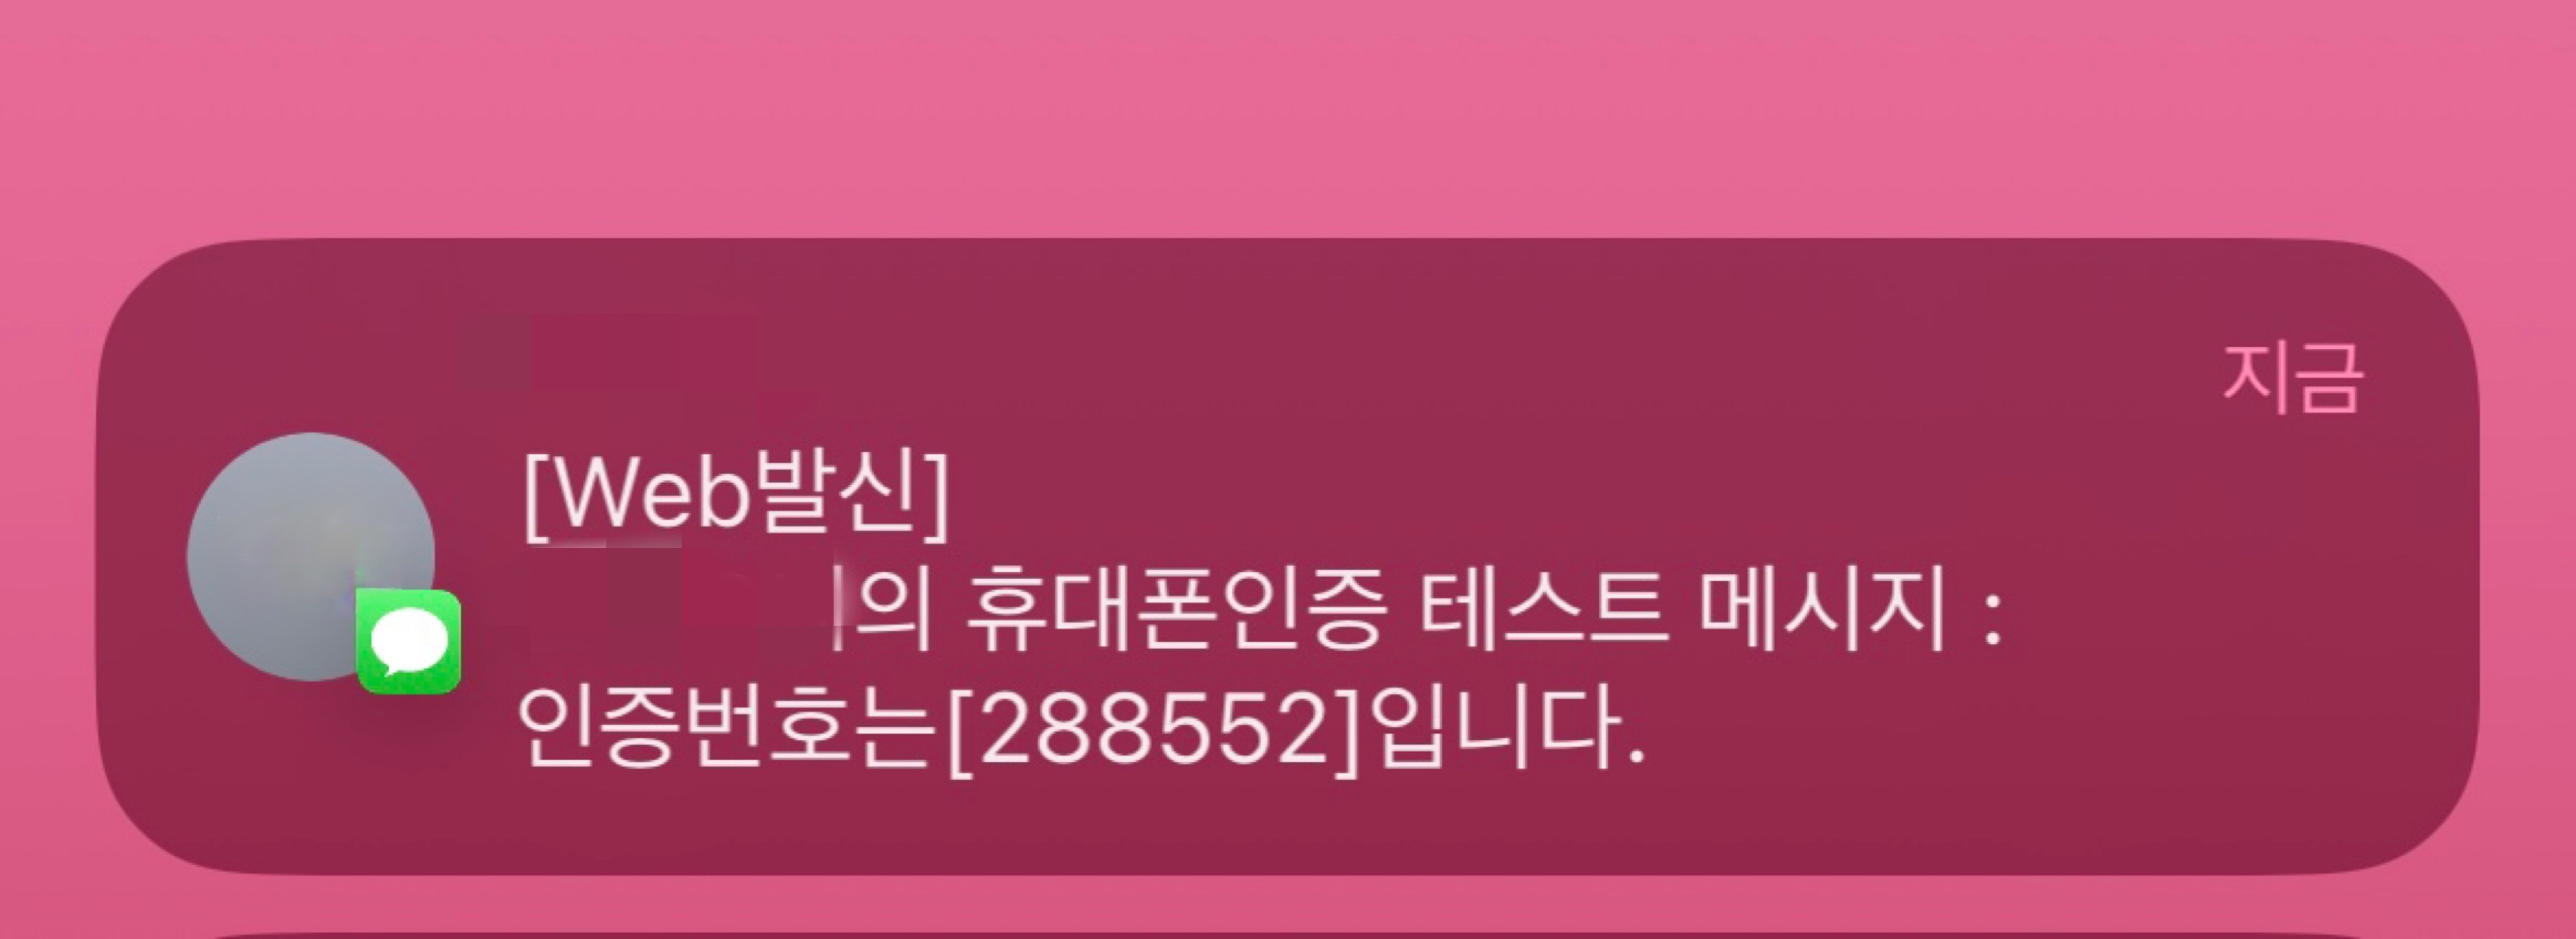
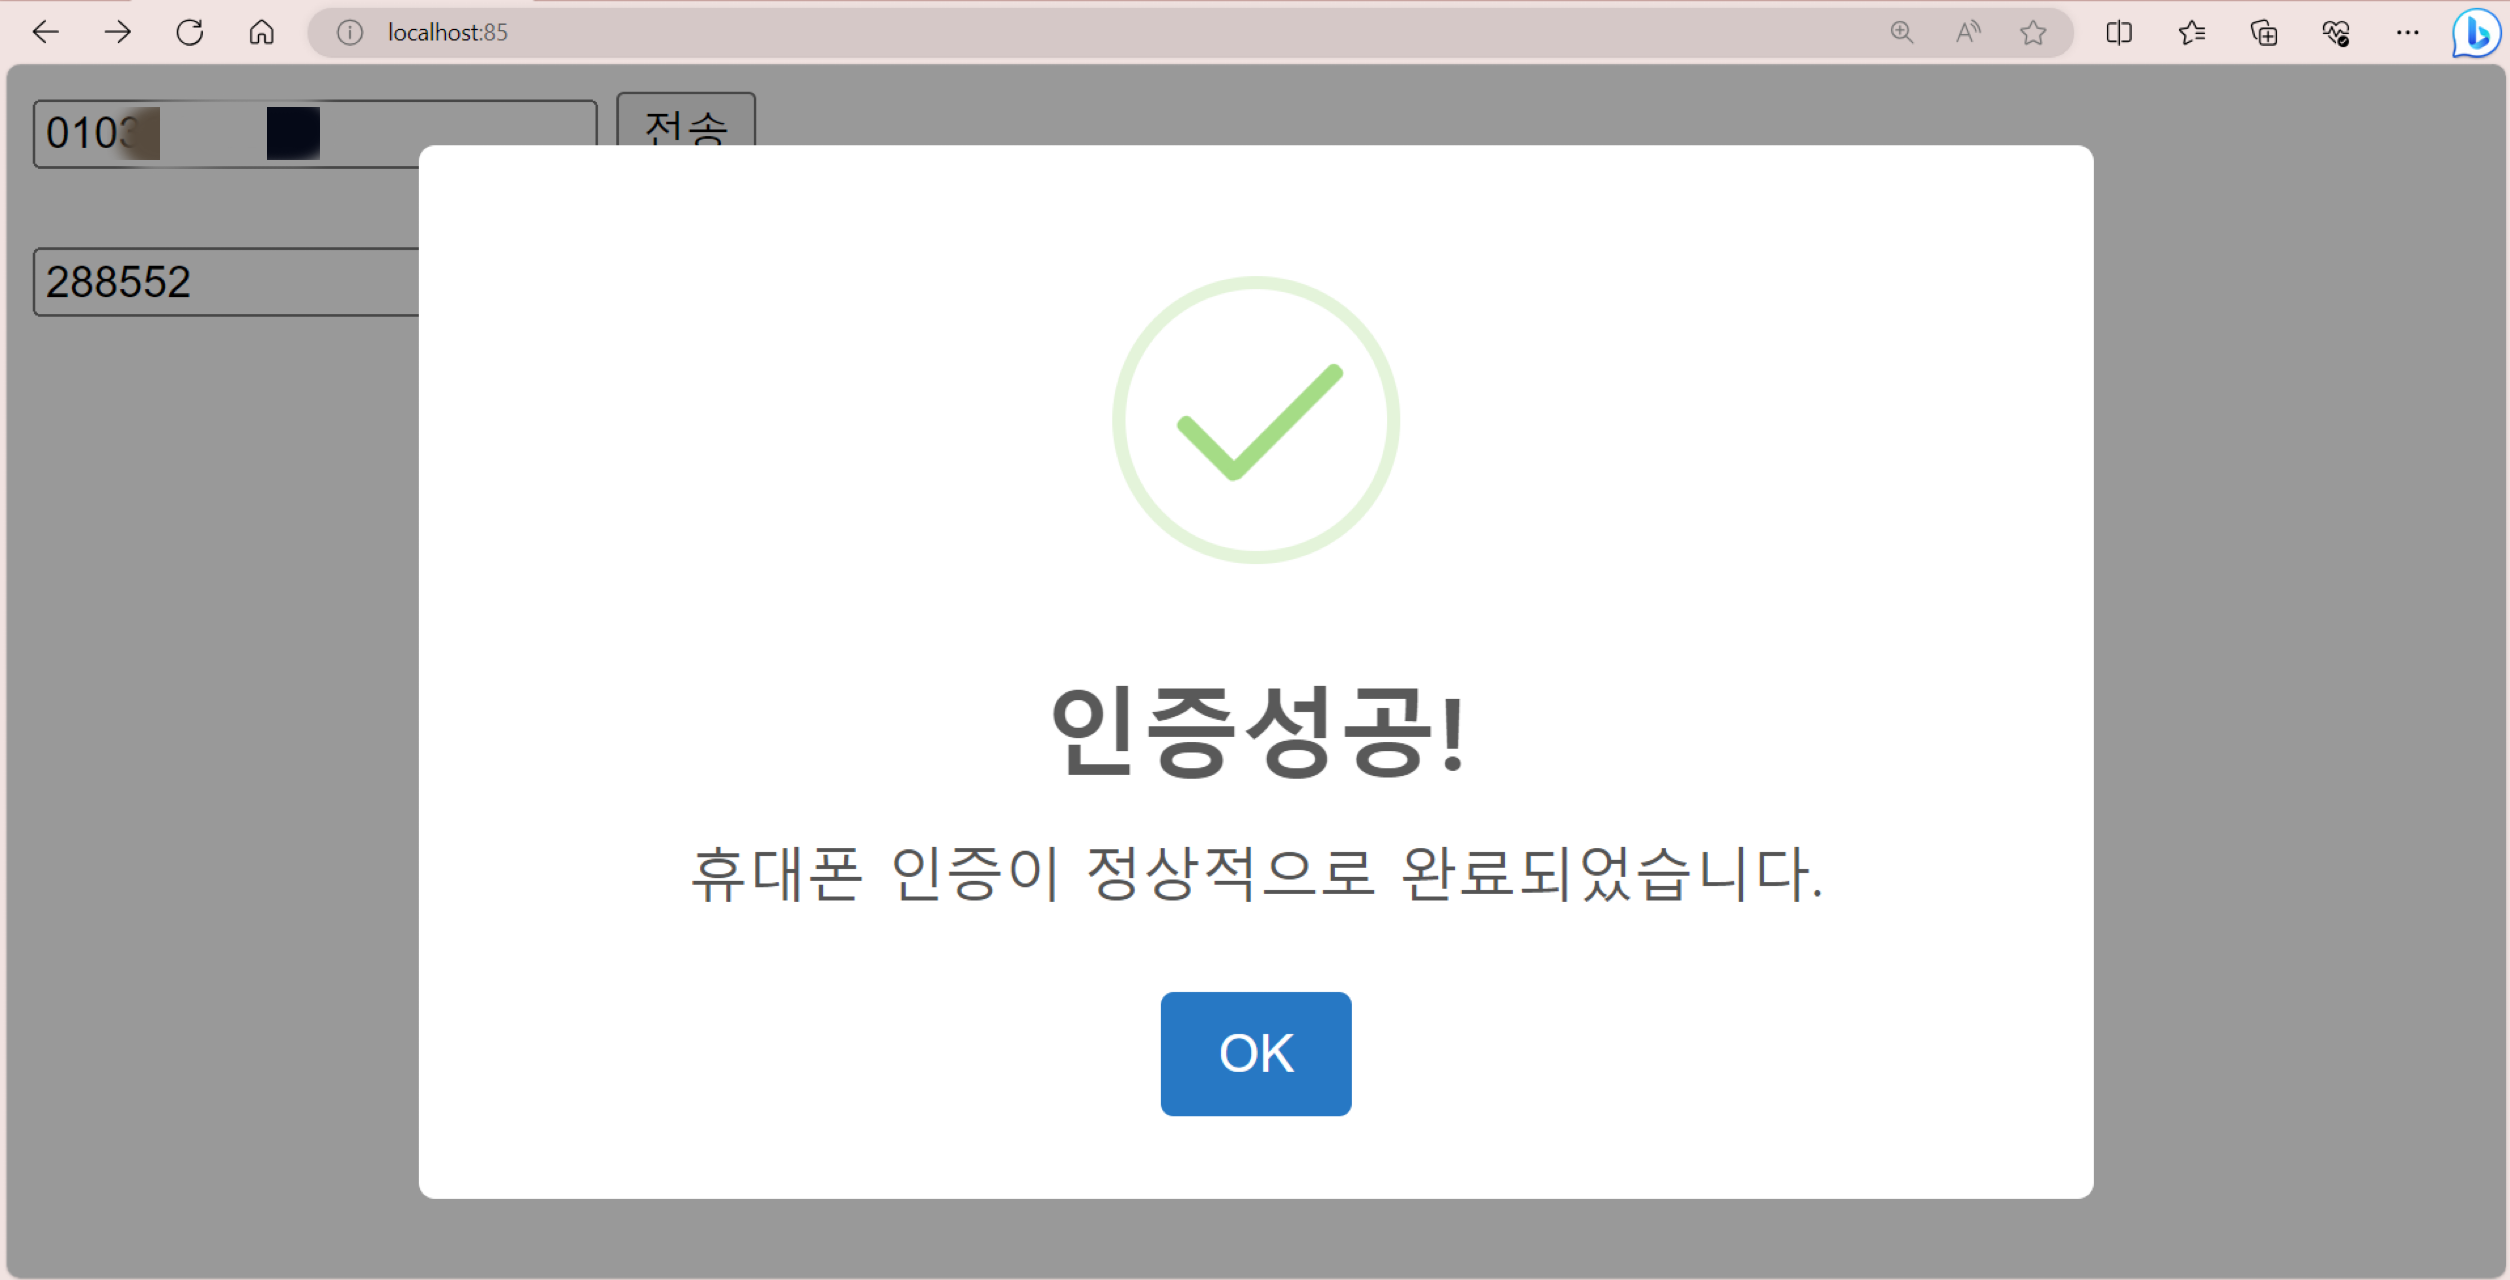
휴대폰으로 잘 문자가 오고 받은 인증번호를 입력하면 인증 성공한다.
CoolSMS 가입 시 300 포인트를 주고 한 번 문자를 보내는 데 20포인트가 소모되니 무료로 15번 보낼 수 있다.
그 다음부터는 결제하여 포인트를 구매해야한다.
https://github.com/Oeuni/CoolSMS_API_Phone
'웹 개발 > Spring' 카테고리의 다른 글
| Chat GPT로 사이트 UI를 구현해보자 - GPT 웹페이지 구현 100% 활용법 (0) | 2024.11.20 |
|---|---|
| Spring 컨트롤러 이름 변경 후 org.springframework.beans.factory.BeanCreationException 에러 해결 방법 (0) | 2024.11.19 |
| Spring Boot 프로젝트 생성하기 - 이클립스(Eclipse), 인텔리제이(Intellij) (0) | 2024.11.13 |
| [Spring Boot] Tmap API를 이용한 Geocoding - 위치 정보를 좌표로 반환하기 (0) | 2024.01.29 |
| [Spring Boot] 파일 업로드와 섬네일 처리 (0) | 2023.10.09 |